Saturday, May 9, 2015

Lots of Bras

After making my first bra, I totally got the lingerie bug. That first try was way too small on my in the cups, but happily it fit one of my friends perfectly, so it's still getting use :). For the next try at Merckwaerdigh Mix30 I made a 34D, and actually fit all of my boobs into it!


Love the teal lace and orange elastic and bow :). I lined the side cup and bridge with a stable flesh coloured tricot, and left the front cups and band as just the stretch lace.
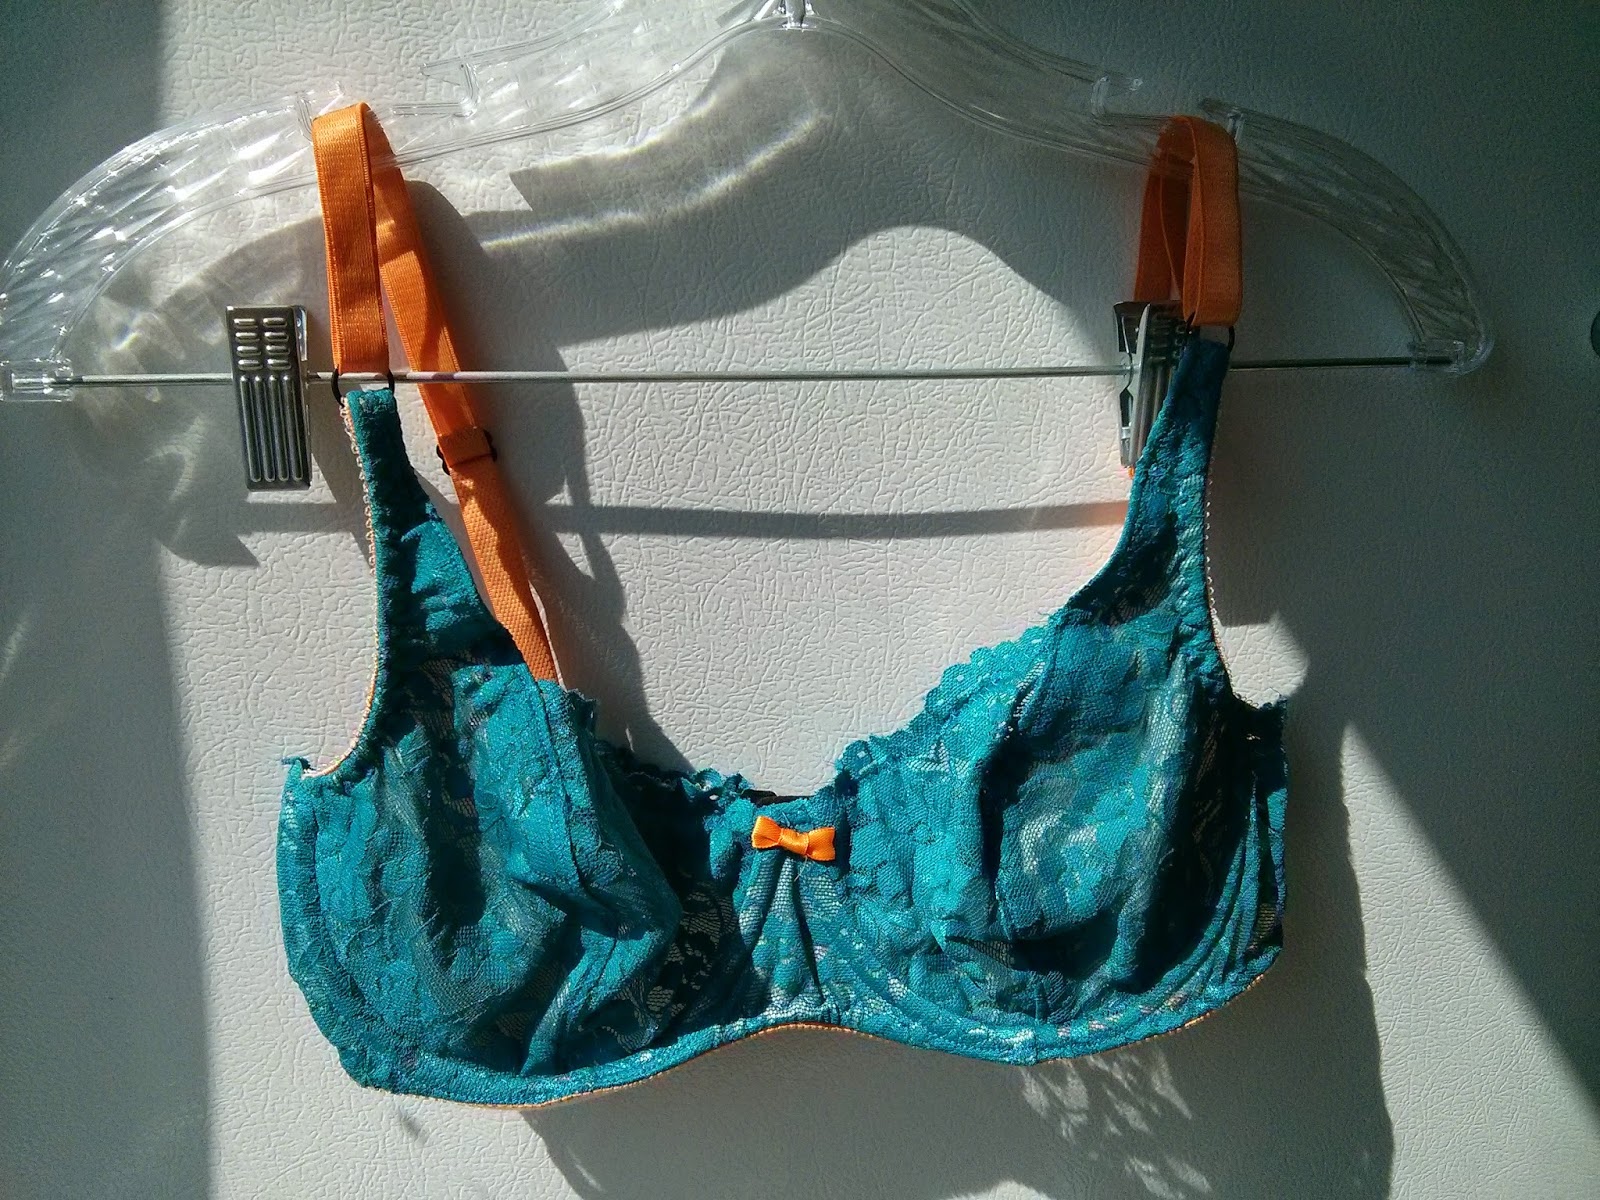

I should have graded the cup seam more thoroughly and topstitched it closer to the seam, because it forms a definite ridge along that seam that is visible through clothing, and I hardly ever wear it because of that. Learning experience!


Once the cups where actually large enough and I could assess the fit of them, the cup seam turned out to be a good inch or more away from the actual apex of my bust. I also realized that I didn't like the strap extension on this pattern, because it doesn't let me where this bra with anything lower cut than a tshirt. So pattern hacking I went!


For the next one I used the glorious purple/blue leopard print from my kit, lined with the same nude tricot for stability, and a black powernet for the band. How cute are those buttons?! I thought this bra was a little too badass for bows.


Pattern wise, I shifted the cup seam 1 full inch toward the centre front, and hacked off the strap extension.it fits much better, but the straps ended up attached much too close to my armpit for comfort or stability, and because of it the top of the cup settles over the day and I end up with a line across the top of my boobs. Getting closer, but still not perfect.


I also added a bit of length to the bridge and band below the cups, so that the underwire casing doesn't get stitched through the band elastic. In my head it made sense, but in practicality it makes the elastic curl to the inside and doesn't hold the wires against my body properly. On to version four!


This one I made from some thin red tricot I had left over from a shirt lining, and a very stiff white powernet. I didn't want two layers for the cups, so I used a foldover elastic to encase the top edge, which worked quite nicely.


I extended the underarm scoop closer to the front, so that the straps can attach at the corner but not be in my armpit. I didn't remember to remove the extra band height, so this one does the same curling at the bottom that the last one does. I'll have to fix that for next time!

I also tried out a different pattern, Quicksew 3300. I like the diagonal seaming on it, for variety sake, and wanted to try making a partial band bra, since that is what I've been used to wearing with rtw.


I used a 34D with this pattern as well, and it fit pretty well first try. I do end up with a flat bit of fabric against my body under my boobs in the cups though, with the wires not sitting up as high as they should, so I'm going to have to find out how to fix that.


For this first one I used a chocolate brown stretch lace for the upper cups and band, light pink satin interfaced to keep it from being all shifty for the lower cups and bridge, and pink elastics with brown stitching. This one is by far the classiest piece of lingerie I own, with it's muted colour scheme and lack of animal print. Must have been channelling someone else when I planned it out :P.


Anyway, that one fit so reasonably well that I made two more from the pattern in quick succession without altering it.


This one in white tricot and powernet with lined mint lace,


and this one in very fine black tricot with black powernet and purple rigid lace trim. This one is by far my favourite that I've made so far, even though it still does the flat underboob fabric thing. The fabric is so shear that this is actually two layers of it and you can still see right through! It weighs almost nothing, and I sometimes forget I'm wearing it.


I also tried out the Marlborough pattern that everyone was raving about, but that was was a disaster through nobodies fault but my own. The pattern itself is lovely from what I can tell, but I made completely the wrong size! Because I was a 34D in both ready to wear and the other two patterns I had used, that was what I made this one in. Once I had finished, tried it on, and failed to be able to breath in it, I checked the measurements the pattern tells you to take and discovered that in this one I should have made a 38C. I'll try that as a starting place for a future version, maybe even recreating my first attempt. Black satin, black and white gingham, red stretch lace, and red star print underwire casings. My friend said it looked like if little red riding hood where a stripper :P. Hell yeah!

Saturday, May 2, 2015

simple jewelry

This isn't so much a craft as simply gluing components together, but I'm going to share anyway!


I have four piercings in each ear, and keep small plain hoops in the two centre pairs, leaving the lowest and highest for decorative daily earrings. I like long danglies in the front and either short danglies or studs in the back, but I didn't have a lot of smallish studs, so I ordered a bunch of resin cabochon flowers and glued them onto earring backs. It was so easy and rewarding that I glued some onto a barrette to match. Sometimes it's nice to have an instant gratification craft :)

Saturday, April 25, 2015

House!

Remember last time how I teased you with yard pictures? It's my very own yard, in my very own house that we bought last fall! OMG I'm such an adult... And then we painted it like rainbow sherbet :)


Yellow for the kitchen,


light blue for the living room,


a royal blue bedroom,


paint that looks like lime sherbet under artificial light...


but like neon lime under natural light,


and a pinky-purple for my sewing room. I have a sewing room!


I've organized it better since these pictures, all my fabric is under this worktable in clear plastic totes. And I got my very first ironing board, so I don't have use a blanket on the table any more!

As you saw in the bedroom picture, we got another cat.


She's tiny and adorable and a huge lap hog.


I put nerdy artwork and housewares everywhere.


And we have a huge yard! With a deck


and a giant old apple tree that we had to trim because it was leaning on the deck.


I planted another apple and two plum trees last fall, and they're all blooming;


as are all the flowers that popped up unexpectedly around the house!


We have a lot of work to do around the place (new roof this year; replace the deck, tub, and hot water tank next year; chase the rats out of the attic; new floor eventually; and on and on and on...), but it's ours, and I'm so very happy!

Saturday, April 18, 2015

Green Christmas Quilt

So, my boyfriend is really hard to buy presents for. He insists that he doesn't want anything, and to be fair he honestly doesn't, but gift giving is as much because the person doing the giving wants to show their love as anything else, and so I still fight every holiday to find something that he will like. Usually I end up making something, and this christmas, I settled on a quilt!


He spends a lot of time curled up on the couch with the cats, all wrapped up in blankets and looking adorable, so it seemed fitting and useful. His favourite colour is green, so green quilt it was!


With the help of a friend who has more quilting experience than I do, I settled on a quadruple rail pattern and headed to the fabric store. Originally I was going to do four different blocks, each with a light/light-med/med-dark/dark set of fabric, but the store would only sell as small as a half meter, so I ended up doing all the same except for the dark. For that one I found four fat quarters of black background prints that I thought went with the theme, although only one is actually a green print. I think it turned out quite nice in the end, and actually it might have been a little busy with 16 different fabrics going on rather than the 7 it ended up with.


Finding green fabrics that aren't christmas print when you're shopping in november turned out to be a chalange, but the only one I ended up caving on was the binding, because it's so narrow the snowflakes end up being more of an abstract pattern. Besides, that can just be winter, right?


To make it extra cuddly, I used a supper fluffy minky fabric for the backing instead of more cotton. Man that was a bitch to quilt! It stuck to everything, including the sewing machine, and I really had to force the damn thing through, but it was worth it because OMG so soft.


I did the quilting as diagonal squares, because I didn't want to brave trying anything fancy, but I didn't want it to just be along the block edged either, because that felt boring. We'll say that the incredibly wavy stitching adds character...


I found some helpful websites and figured out how to mitre the corners of the binding properly. I hand stitched the binding down on the back, and the minky did a great job of helping make the stitches completely invisible.


It's been washed a few times now, so the batting has shrunk just enough to give that heirloom quilt puckering, which actually looks quite nice (thankfully).


This is more what the colours look like in person. Oh yeah, the whole thing is 64" square, which turned out to be a little smaller than I would make in the future, but just barely big enough to make a good lap quilt. I can't wait to make some good giant queen bed sized ones to swaddle up in! Also yes, that is a new back yard, and I'll tell you all about it next time :P.

Saturday, July 12, 2014

First time bramaking!

After ages of drooling over pretty bras handmade by Tasia, Caroline, and Novita, I couldn't take it any more and just had to give the whole thing a try myself! I bought a gloriously tacky bra and panty making kit from Merckwaerdigh, and a copy of their mix30 pattern. Usually I'm a demicup kind of lady, so the relatively low cut of this pattern made it stand out to me. Also, look at the cute colour blocking possibilities!

https://www.etsy.com/ca/listing/58508683/sewing-pattern-mix30-with-bra-pantie

Because I'm the sort of person who refuses to do anything without extensive research, I read through all of the bra sew-along posts over at Cloth Habit before cutting out anything. I love Amy's way of explaining things, she's thorough but incredibly easy to understand. And by the time I was through, the whole prospect didn't seem so daunting any more, so I got started! In the end, it only took an afternoon to make, and I didn't do so shabbily, if I do say so myself :).


There is a little bit of bubbling on the bridge where the fashion fabric stretched and the lining didn't, and some rippling along the vertical cup seam for the same reason, but it's not super noticeable.


The band fits perfectly, but the cups need some work. Quad boob and underarm squish is not what I'm looking for in a bra! The sizing chart confused me a little, so I just cut the size that my rtw bras are (even though I knew they likely suffered from vanity sizing and wildly variable standards), but in this style/pattern/reality it seems that a 34C is not going to cut it. I was waffling between the 95 and 100 underwires too, and went in the end with the 95s. Next time I will try a 34D and the next size up of wires.

<Tangent>

Speaking of wires, am I the only one annoyed at the way sizing can't manage to be globally standard for anything?! I need size 100 wires from Merckwaerdigh, but size 40 from North American sellers; I'm a shoe size 8 in North America, 6 in the UK, and 39 in Europe. And don't even get me started on the half-assed way Canada has converted to the Metric System! I use kilometres for speed and long distances but feet and inches for short distances, pounds for weight but litres for volume. I've finally managed to fully convert with temperature, but for a long time I thought of outside in Fahrenheit and inside in Celsius. I mean seriously, I know the USA is stubborn and influences a lot of what we do through imported media, but Metric is just plain superior to Imperial. Easier to manipulate mathematically, often more precise, actually based on logic instead of cobbled together from bits and pieces of outdated systems. Personally, I've just decided (earlier today, hahaha) to make an effort and try to start thinking in centimetres instead of inches, or at least as well as. The seam allowances I added to these patterns would drive a lot of people crazy, with 1/4" and 1/2" for the edges where the elastic attaches and a 1cm s/a for fabric to fabric joins (turns out 1cm is the exact width between my presser foot edge and my offset/zigzagging needle position), but it's a start :P.

</Tangent>


At least the construction went smoothly! Perhaps it was due to previous experience with channels in corset making and elastic in the swimsuit I made a few weeks ago (to be blogged about shortly!), but nothing about this felt new, there was just an unusually large amount of stuff going on for such a small finished garment!


I've never had a non-foam bra before, mostly because the cheap rtw stuff I usually end up with offers very little in the way of alternatives. But fabric bras are amazing! Even with the fit problems of this one, I'm loving the way it lets my boobs actually look like, well, boobs, and not foam-dome Barbie chest. And I have to say, the sexy possibilities of a bra you can actually feel something through is intriguing ;).

Anyway, since there where lots of supplies left, I tried out the mix30 undies pattern as well, view C. And discovered that even in size L, they're just a tad too small to be comfortable. I guess the pattern could be graded up a bit, but the general bum shape feels like it will be constant wedgie town either way, so I'll probably just alter Zo's underwear pattern to make it a little more fancy if I want this style in the future.


If the Merckwaerdigh pattern wasn't going to cut if for a matching set, I thought I may as well try making my own. My favourite undies are usually soft thongs with wide lace as the waist, so I basically just traced around an existing pair to get a pattern. Unfortunately, I forgot to add a seam allowance along the sides to account for turning the elastic, and the first pair of these was also a too small failure *sigh*.


For the second try I added width for the elastic and height to account for using thin lace instead of thick as the waist. And of course by then I was out of picot elastic from the kit and was using the same lace elastic for the sides as for the waist, which I just top-stitched on instead of flipping, and therefor didn't need a s/a. Now they are a little wider than needed, but at least I can actually wear them! And once I make another, larger bra from the scads of leftover purple leopard print, I'll have an actual set of matching lingerie :). Funny story: I polled my Guy (and then all my male friends), and discovered that men seem to be indifferent when it comes to coordination of lingerie. Actually, mine half-jokingly says he can't support my bra making endeavours, in much the same way I insist a shirt and no pants is a good look for him :P.

Luckily, I dress entirely for my own enjoyment, and that means lots more pretty frilly things to come! I may have gone a little overboard with the bra making supplies, but once my five more packages show up I should be good for a while...