Saturday, July 25, 2015

flutter sleeve renfrews

A while ago I realized what everyone else already knows, that knit tops are just plain easier to wear than woven, and that they are what one will generally reach for first when deciding what to put on in the morning. Which meant I really needed some fun/cute t-shirt type tops!


The thing was, if I'm going to have sleeves I want them to be interesting. So I took the sleeve piece from view f of simplicty 2364 and hacked it up until it fit into the armscythe of the sewaholic renfrew.


Yay for flutter sleeves! I made the first one up in a soft and drapey black rayon knit, and I wear it so often that a few days ago I made up another in a bright blue cotton jersey.


It has polka-dots! This fabric is a fair bit thicker and more stable than the rayon, so it will be interesting to see how it differs in fit and feel (I haven't actually worn it yet except for trying on).


My local fabric store has a decent selection of bamboo knits, and I will probably have to pick up a bunch and make more variations of this top. It's both cute and comfortable, and I do so love looking like I made an effort while feeling like I'm still in pajamas :P.

Also, knit tops are so easy to make! I made the blue one in the 4 hours it took my guy to have D&D night, and still had time to make three more pairs of panties!


The black ones are actually the scraps from that first top, omg soft!

Saturday, July 18, 2015

Formal sheet dresses?

...Is that an oxymoron? Because these two dresses both ended up being the kind of thing I'll probably only wear to events where I should really probably look somewhat respectable. My guy says they look like curtains, and I can't entirely disagree!


I made them both from New Look 6749 (picked up at value village for .99 cents, score!), and both from sheets that my mom gave me after she got a differently sized bed and couldn't use them any more.


Other than the pattern and fabric, everything else for them came out of my stash and remnants, so while these dresses may not get a lot of use, at least they were practically free! I used view D for this one, with short lengths of lace trim used instead of fabric tubes for the strap bands.


I predictably had to take a big wedge out along the centre back seam to make it fit my back, with caused the bodice/skirt seam to meet in a V at the zipper. I know that is probably considered a bad thing, but with the lace along that seam I think it looks quite pretty!


For the second dress I made view B (I would have done C, which has the narrow straps, to make it more distinct from the first one, but at this point I was still thinking I would wear them to work, and we have a 2" strap minimum). I used the same lace as on the first one, but around the hem to add a little interest to the bottom of otherwise boring skirt.


The patterns originally had a narrow shift-type skirt, but I didn't feel like trying to make it work with my swayback/giant booty, so I slashed and spread to make both the front and back about twice as full, and divided each side of the skirt back into two panels split where the dart originally went.


With the fuller skirt and empire waistline, the dresses ended up having a slight regency vibe. It isn't the most flattering thing for my figure, largely obscuring my waist, but it's got a certain elegance to it.


While I was a little disappointed that these ended up feeling more classy than I'm comfortable rocking on a daily basis, I can't argue with actually having something normal in the closet for those occasions when one can't get away with superheros and ruffles, hahaha.

Saturday, July 11, 2015

Blue apple top

A few years ago I bought this fabric online on a whim, and then (as so often happens) had no idea what to do with it. So it sat in my stash until a few weeks ago, when I got Butterick 4132 in the post.

The very qualities of the fabric that had left me scratching my head before made it perfect for this pattern; light and drapey, fairly shear, strange pattern. I even decided that the semi-subtle stripes of apple/flowers and metallic silver thread just made the bias cutting easier! I used view A, because it is too bloody hot for sleeves right now.


The fabric is light enough that the facing used to finish the neckline/armholes doesn't bother me, and I was feeling lazy enough that I just pinked the lower edge of the facing, so it came together super quickly. In fact, I made the whole thing in the time it took to watch Batman Begins!


I cut a straight size 14, and the only fit issue I had was gaping at the back neckline. Really I should just make this adjustment as a matter of course, because Big4 patterns are always way too big for me across the upper back. Luckily with this one it was an easy fix of opening out the facing and making two long narrow darts; now it fits beautifully, and I think they even look intentional instead of like a last minute hack!


The only down side is that I managed to cut this top out of only half the length of fabric! Or is that an up side? I guess it goes back into the stash until I decide :P.

(oh, and it's kind of scratchy it you tuck it in, thanks to the metallic thread...)

Wednesday, July 1, 2015

Unmentionable Canada Day

Happy Canada Day! I meant to celebrate by making a watermelon themed dress (more on that late), but got distracted making skanky underwear instead, hahaha.


I finally got around to making a pattern from my favourite rtw undies, and now all the lacy goodness can be mine!!!


With the stretch lace and lingerie elastic I had on hand, and scraps of jersey left over from other projects, I managed to make four pairs in a few hours. I have some more stretch lace kicking around that I just have to decide on a fabric match for, but I'll definitely be ordering more lace and making tonnes of these to replace my rtw ones that have seen better days. Then all of my undergarments will officially be made-by-me! I always feel slightly smug when I know I made EVERYTHING I'm wearing, hahaha.

Hope you guys have/had a great Canada Day!

Saturday, May 16, 2015

Not a july 4th Quilt

Hot on the heels of finishing my boyfriend's christmas quilt, I decided I wanted to make one for my Mom's birthday as well. I made her one several years ago, but used crazy thick batting because I didn't know any better, and she can only use it a few weeks a year! Right now she's on a kick of wanting everything to be red, so I went with a red and blue theme contrasting with a white background.


And then I started to worry that it would look like a 4th of July picnic blanket... But I forged ahead anyway! Using this pattern from Connecting Threads, I cut out a crapload of squares, stitched, cut some more, pressed, stitched, pressed stitched....


 It was really exciting seeing the pattern come together slowly but steadily into a recognizable design.


You wonder how in the world this is going to look like a star, and then two more seams and bam!


So pretty! The OCD math nerd in my had a blast measuring and cutting and making sure all the corners met up just right.


I was originally planning on adding a border around the whole thing to make it bigger, but once all the sashing strips where in place and I remembered that it only needed to fit a twin bed, I decided to leave it just as the pattern had written it. I had to move the carpet and coffee table and lay it out on the living room floor to layer and pin it, because my sewing room didn't have enough free floor space.


Once it was all pinned I used spare yarn to try and figure out a good design for the quilting. That part took way too long, because I just couldn't decide, but I eventually settled on this, in the hopes of accentuating the star motif.


Gratuitous picture of the binding because I'm super proud of how little of the hand stitches can be seen :P. Also because it took me 6 hours of hand sewing... An Alien marathon saved that from being completely tedious.


And it was all worth it, because look how pretty! I had to run it through the wash when I was done, because it was covered in cat hair and lint, and it shrunk up in a charming fashion that really helps the quilting stitches pop in person. And it doesn't look like a picnic blanket after all, thank god. My Mom loved it, and now she doesn't have to wait till the dead of what passes for winter here to have quilty goodness, handmade for her with love :).

Saturday, May 9, 2015

Lots of Bras

After making my first bra, I totally got the lingerie bug. That first try was way too small on my in the cups, but happily it fit one of my friends perfectly, so it's still getting use :). For the next try at Merckwaerdigh Mix30 I made a 34D, and actually fit all of my boobs into it!


Love the teal lace and orange elastic and bow :). I lined the side cup and bridge with a stable flesh coloured tricot, and left the front cups and band as just the stretch lace.


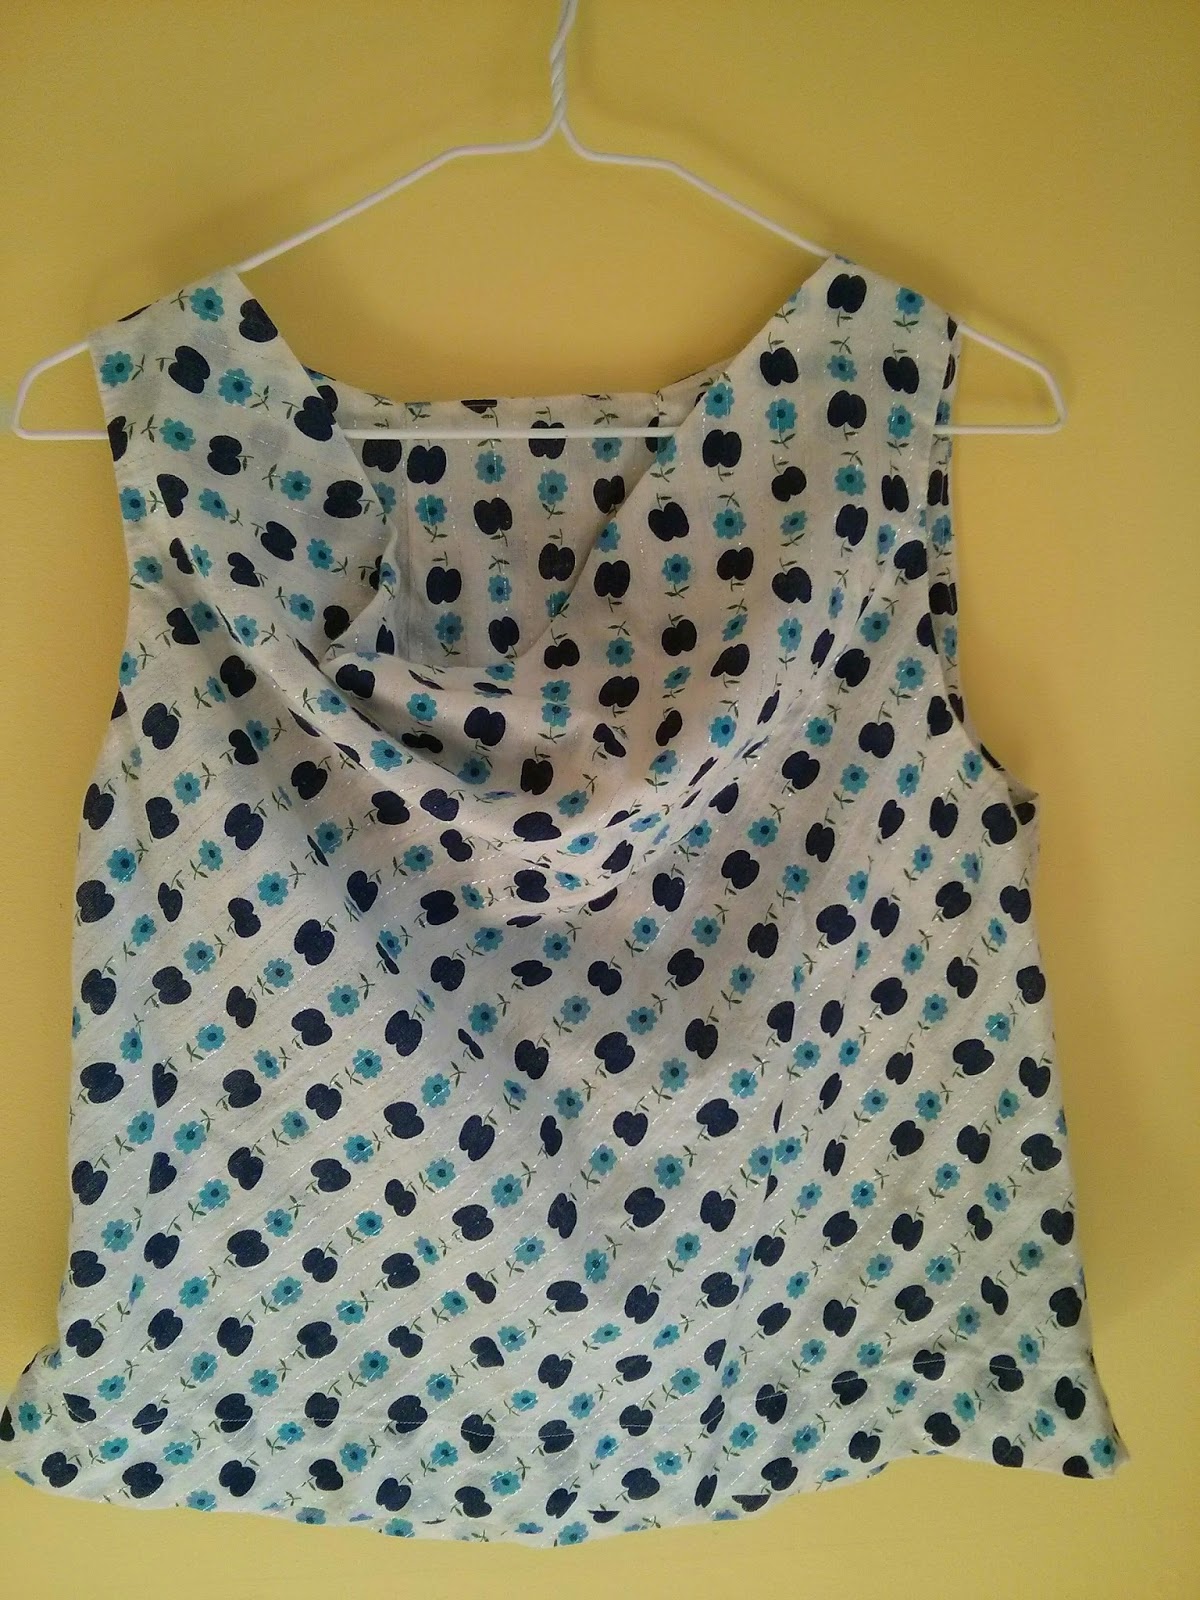
I should have graded the cup seam more thoroughly and topstitched it closer to the seam, because it forms a definite ridge along that seam that is visible through clothing, and I hardly ever wear it because of that. Learning experience!


Once the cups where actually large enough and I could assess the fit of them, the cup seam turned out to be a good inch or more away from the actual apex of my bust. I also realized that I didn't like the strap extension on this pattern, because it doesn't let me where this bra with anything lower cut than a tshirt. So pattern hacking I went!


For the next one I used the glorious purple/blue leopard print from my kit, lined with the same nude tricot for stability, and a black powernet for the band. How cute are those buttons?! I thought this bra was a little too badass for bows.


Pattern wise, I shifted the cup seam 1 full inch toward the centre front, and hacked off the strap extension.it fits much better, but the straps ended up attached much too close to my armpit for comfort or stability, and because of it the top of the cup settles over the day and I end up with a line across the top of my boobs. Getting closer, but still not perfect.


I also added a bit of length to the bridge and band below the cups, so that the underwire casing doesn't get stitched through the band elastic. In my head it made sense, but in practicality it makes the elastic curl to the inside and doesn't hold the wires against my body properly. On to version four!


This one I made from some thin red tricot I had left over from a shirt lining, and a very stiff white powernet. I didn't want two layers for the cups, so I used a foldover elastic to encase the top edge, which worked quite nicely.


I extended the underarm scoop closer to the front, so that the straps can attach at the corner but not be in my armpit. I didn't remember to remove the extra band height, so this one does the same curling at the bottom that the last one does. I'll have to fix that for next time!

I also tried out a different pattern, Quicksew 3300. I like the diagonal seaming on it, for variety sake, and wanted to try making a partial band bra, since that is what I've been used to wearing with rtw.


I used a 34D with this pattern as well, and it fit pretty well first try. I do end up with a flat bit of fabric against my body under my boobs in the cups though, with the wires not sitting up as high as they should, so I'm going to have to find out how to fix that.


For this first one I used a chocolate brown stretch lace for the upper cups and band, light pink satin interfaced to keep it from being all shifty for the lower cups and bridge, and pink elastics with brown stitching. This one is by far the classiest piece of lingerie I own, with it's muted colour scheme and lack of animal print. Must have been channelling someone else when I planned it out :P.


Anyway, that one fit so reasonably well that I made two more from the pattern in quick succession without altering it.


This one in white tricot and powernet with lined mint lace,


and this one in very fine black tricot with black powernet and purple rigid lace trim. This one is by far my favourite that I've made so far, even though it still does the flat underboob fabric thing. The fabric is so shear that this is actually two layers of it and you can still see right through! It weighs almost nothing, and I sometimes forget I'm wearing it.


I also tried out the Marlborough pattern that everyone was raving about, but that was was a disaster through nobodies fault but my own. The pattern itself is lovely from what I can tell, but I made completely the wrong size! Because I was a 34D in both ready to wear and the other two patterns I had used, that was what I made this one in. Once I had finished, tried it on, and failed to be able to breath in it, I checked the measurements the pattern tells you to take and discovered that in this one I should have made a 38C. I'll try that as a starting place for a future version, maybe even recreating my first attempt. Black satin, black and white gingham, red stretch lace, and red star print underwire casings. My friend said it looked like if little red riding hood where a stripper :P. Hell yeah!

Saturday, May 2, 2015

simple jewelry

This isn't so much a craft as simply gluing components together, but I'm going to share anyway!


I have four piercings in each ear, and keep small plain hoops in the two centre pairs, leaving the lowest and highest for decorative daily earrings. I like long danglies in the front and either short danglies or studs in the back, but I didn't have a lot of smallish studs, so I ordered a bunch of resin cabochon flowers and glued them onto earring backs. It was so easy and rewarding that I glued some onto a barrette to match. Sometimes it's nice to have an instant gratification craft :)

Saturday, April 25, 2015

House!

Remember last time how I teased you with yard pictures? It's my very own yard, in my very own house that we bought last fall! OMG I'm such an adult... And then we painted it like rainbow sherbet :)


Yellow for the kitchen,


light blue for the living room,


a royal blue bedroom,


paint that looks like lime sherbet under artificial light...


but like neon lime under natural light,


and a pinky-purple for my sewing room. I have a sewing room!


I've organized it better since these pictures, all my fabric is under this worktable in clear plastic totes. And I got my very first ironing board, so I don't have use a blanket on the table any more!

As you saw in the bedroom picture, we got another cat.


She's tiny and adorable and a huge lap hog.


I put nerdy artwork and housewares everywhere.


And we have a huge yard! With a deck


and a giant old apple tree that we had to trim because it was leaning on the deck.


I planted another apple and two plum trees last fall, and they're all blooming;


as are all the flowers that popped up unexpectedly around the house!


We have a lot of work to do around the place (new roof this year; replace the deck, tub, and hot water tank next year; chase the rats out of the attic; new floor eventually; and on and on and on...), but it's ours, and I'm so very happy!